What's new in NodeStitch stitch charts: round diagrams you draw, written out as rounds, and a better photo to chart
NodeStitch’s free form crochet diagrams now write themselves out. Draw a doily, a motif or a granny square with stitch symbols, and the Written tab reads it back round by round, the way a pattern reads, down to whether each stitch goes into a stitch, around a chain or into the chain itself. Photo to chart got a lot better too, and big charts now print at a size you can actually stitch from.
Why there are so many updates
I’ll be honest, building a tool that can really help other fiber artists means a lot to me, and I’m always looking for ways to make it better. I don’t really make charts myself, so most of what’s in this post came from my own digging into what stitch charts should do, how they should look, and how the written pattern should match what’s on the diagram.
That’s exactly why I want your feedback. I’m not an expert on chart design, and people who chart will see things I can’t. So if something in here doesn’t work the way you chart, please tell me.
Round diagrams that write their own rounds
Free form diagrams are for the charts that don’t sit on a grid: doilies, motifs, mandalas, granny squares, anything where the stitches sit on circles instead of rows. You place stitch symbols anywhere, and now the Written tab writes the diagram out as a pattern:
Rnd 1: MR, ch 3 (counts as dc), 2 dc in ring, ch 2, *3 dc in ring, ch 2; rep from * 2 more times, sl st to top of beg ch-3. (12 dc, 4 ch-2 sps)
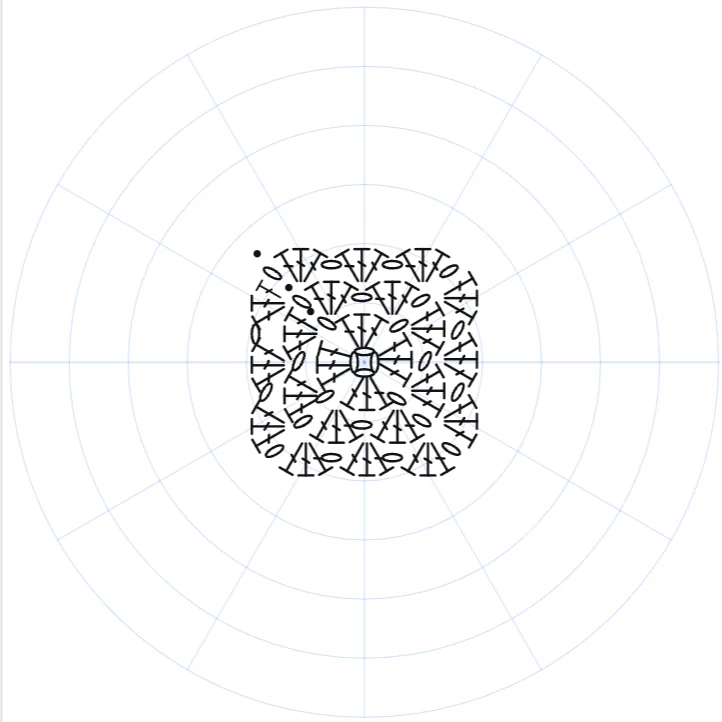
Here’s a granny square drawn in NodeStitch, on the guide rings and spokes that help you place each stitch around the center:
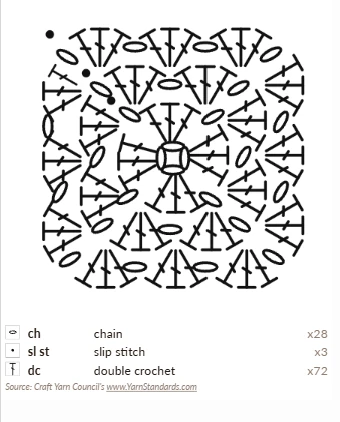
And here it is on the pattern page, with the legend it builds from the stitches you used:
I built this to be as accurate as I could make it, because a written round is only useful if it says exactly what you drew. A pattern lives or dies on details like where a stitch actually goes, so that’s where most of the work went.
Every stitch knows what it’s worked into
Each stitch connects to a place in the round below: a stitch, a chain space, a single chain, or the ring in round 1. NodeStitch starts with the nearest one to the stitch’s base, and you can change it by dragging the end of the stitch’s arrow onto where it really goes. The place lights up green and names itself as you drag, so you know what you’re dropping it on.
That matters most with chains, because crochet works chains in more than one way:
- Around the chain, into its space: “3 dc in next ch-2 sp”. This is the usual way, and the default.
- Into the chain itself: “dc in next ch”, each stitch in the chain it sits on.
You can set that for the whole diagram, then change single stitches with a right click when one or two are different. Holding Alt as you drop an arrow picks the other way too.
It writes the rest of the details a pattern needs:
- Several stitches in one place are grouped, with the chains between them: “(3 dc, ch 2, 3 dc) in next ch-2 sp”, and “in same st” when the next group goes back into the same place.
- Skipped stitches are said out loud: “sk next 2 sts”, or “miss” if you write in UK terms. A chain space already implies its own skip, so it doesn’t say it twice.
- Front loop, back loop and third loop marks read as “in back loop of next st”.
- Front and back post stitches are worked around a stitch, not in it, and the round says so.
- The beginning chain counts as a stitch only when it’s tall enough to stand in for one (ch 3 for dc, ch 2 for hdc), so a ch 1 before single crochet never does. You can turn counting off and it writes “does not count as a st”.
- Repeats are found and written once: “*3 dc in ring, ch 2; rep from * 2 more times”, or “2 sc in each st around” when every stitch gets the same thing.
Rounds the way you actually work them
You choose how the rounds are read:
- Squares or circles. Choose squares for a granny square, so a corner stays in the same round as its sides.
- Joined, in a spiral, or alternating. Joined rounds close with a slip stitch. Spiral rounds start with “Work in a spiral: do not join the rounds,” like amigurumi. Alternating rounds turn the work after each round and read the next one the other way.
- Counterclockwise or clockwise, whichever way you drew it.
It won’t guess
This is the part I care about most. If a stitch has no clear place to be worked into, or could go into either of two places, NodeStitch doesn’t pick one for you. The round says “in [?]” and the Checks list tells you which stitch it is. It also flags a joined round with no join, and Add sl st join draws the slip stitch on the diagram so the diagram and the words agree. A wrong guess that reads like a fact is worse than an honest question mark.
The stitch counts after each round are what your diagram shows. Treat them as a check against your sample, not a promise.
Drawing is quicker too
- Copy around the center: draw one repeat of a round, like 3 dc and ch 2, and copy it around as many times as you need.
- Ring of one symbol makes a whole round of one stitch, like the chains around a magic ring, with the stitches touching to start.
- Show rounds and what each stitch is worked into tints each round and draws the arrows, so you can see the whole structure at a glance.
Drawing free form diagrams is free. Everyone sees the first three written rounds, and Pro sees every round.
Photo to chart got a lot better
Pixel art comes in exactly. If your picture is already a chart, like a sprite, a cross stitch pattern saved as a PNG or a graphgan you drew in a paint program, NodeStitch notices and offers to import it exactly: one cell becomes one stitch, and every color is kept.
Photos keep their shape in the finished piece. The rows are worked out from your gauge, so a square photo comes out square in your actual stitches, not stretched.
Colors stay apart. Each stitch takes the main color under it instead of a muddy blend, so a face, a white top and a pale background don’t run together. If two shades you wanted separate got combined, you can split them back out with one click.
Matching to real yarn, and checking it first. Match the chart to a yarn line and you see each of your colors beside the yarn it would become, marked Close, A little off or Far off. Don’t like one? Pick a different yarn for that color. Preview on photo shows the whole chart in that yarn line’s colors before you commit, and nothing changes until you say so.
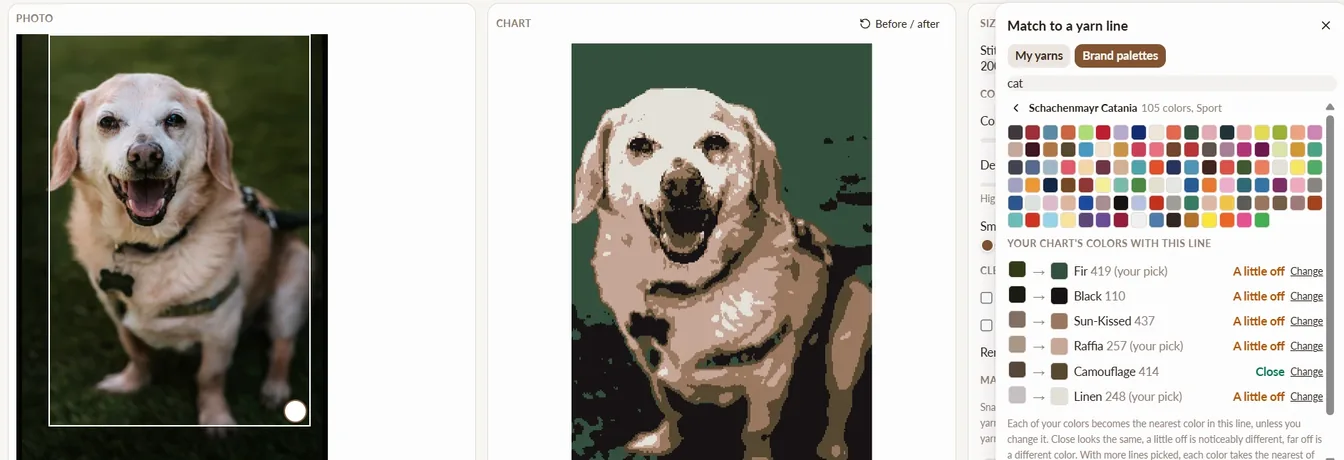
Find a yarn the way the brand labels it. For yarn lines where NodeStitch has the brand’s own color list, you can search by the color number on the label, and the legend prints that number so you can buy by it. When a brand names its colors in another language, NodeStitch shows an English name but keeps the original searchable, so you can type it the way it’s printed on the ball band. Accents don’t matter, and “weiss” finds “weiß”.
For some lines there’s now a Where to buy link to the retailer. Those are affiliate links, so NodeStitch gets a small commission at no cost to you, and it says so beside every link.
Big charts print big enough to stitch from
A big chart squeezed onto one page prints too small to follow. Now:
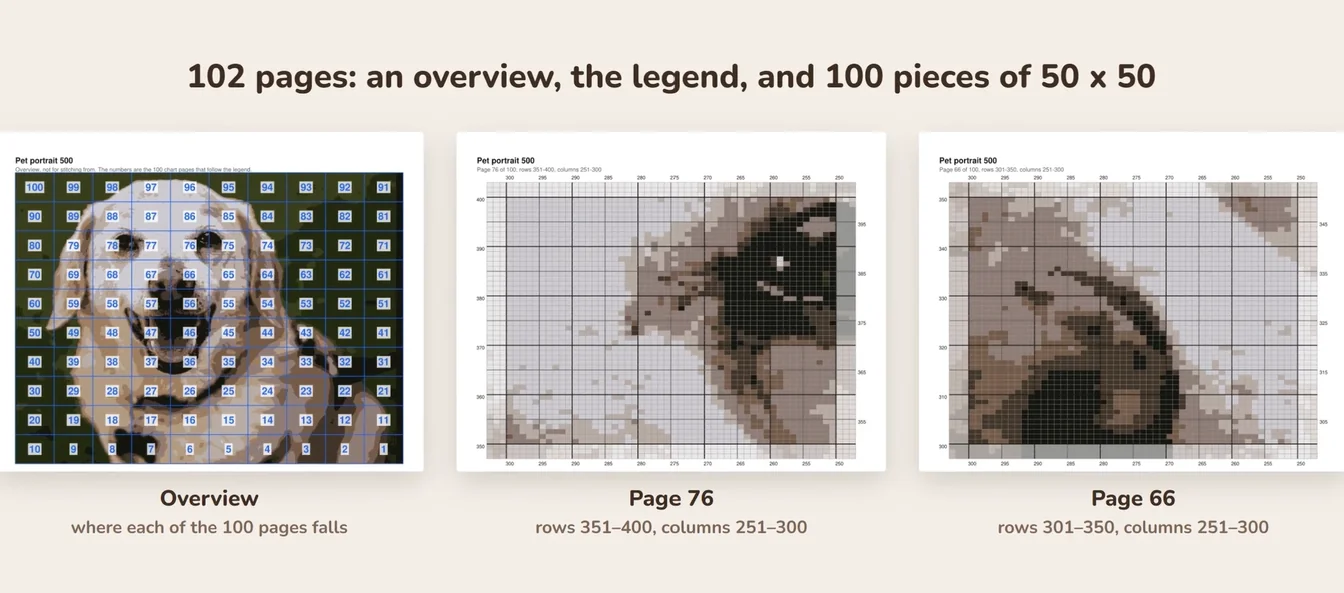
- Exporting a chart (Pro) splits it across pages with squares no smaller than you can read, starting with a small overview of the whole chart and which page covers which part. Every page keeps the chart’s real row and column numbers, and pages can overlap by a few stitches so they line up.
- In your pattern’s PDF (Pro), a chart too big to read on its page also gets those split pages at the end of the file.
- In the editor, Fit zooms out until even a huge chart fits on your screen.
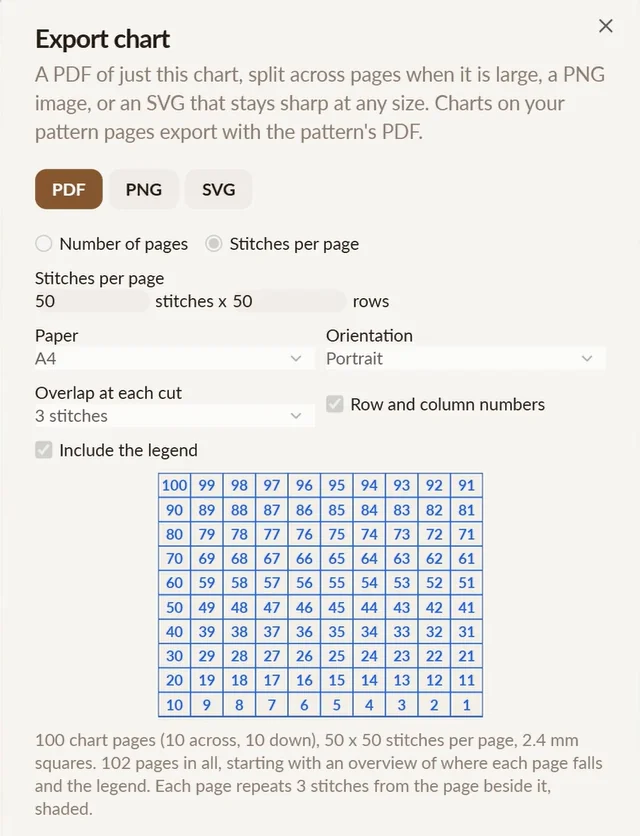
You decide how it splits: by a number of pages, or by how many stitches go on each page, on A4, Letter, A3, A5, Legal or Tabloid paper, with no overlap or 3 or 5 stitches repeated at each cut. Here’s a 500 x 500 pet portrait set to 50 x 50 stitches a page. The export window maps out where every page falls before you download anything:
And this is the PDF it makes: an overview of the whole chart with each page numbered on it, the legend, then 100 pages of 50 x 50, each one labeled with its real rows and columns.
Testers get the written rows too
If you have Pro, a chart’s share link now shows each row’s written instructions to everyone following it, whatever their own plan. A link keeps them even if your plan ends later, so nobody loses them halfway through a project.
Written rows that name your yarns
The Written tab writes every row out with its stitch counts. By default it uses letters, like “15 Color A, 11 Color B”:
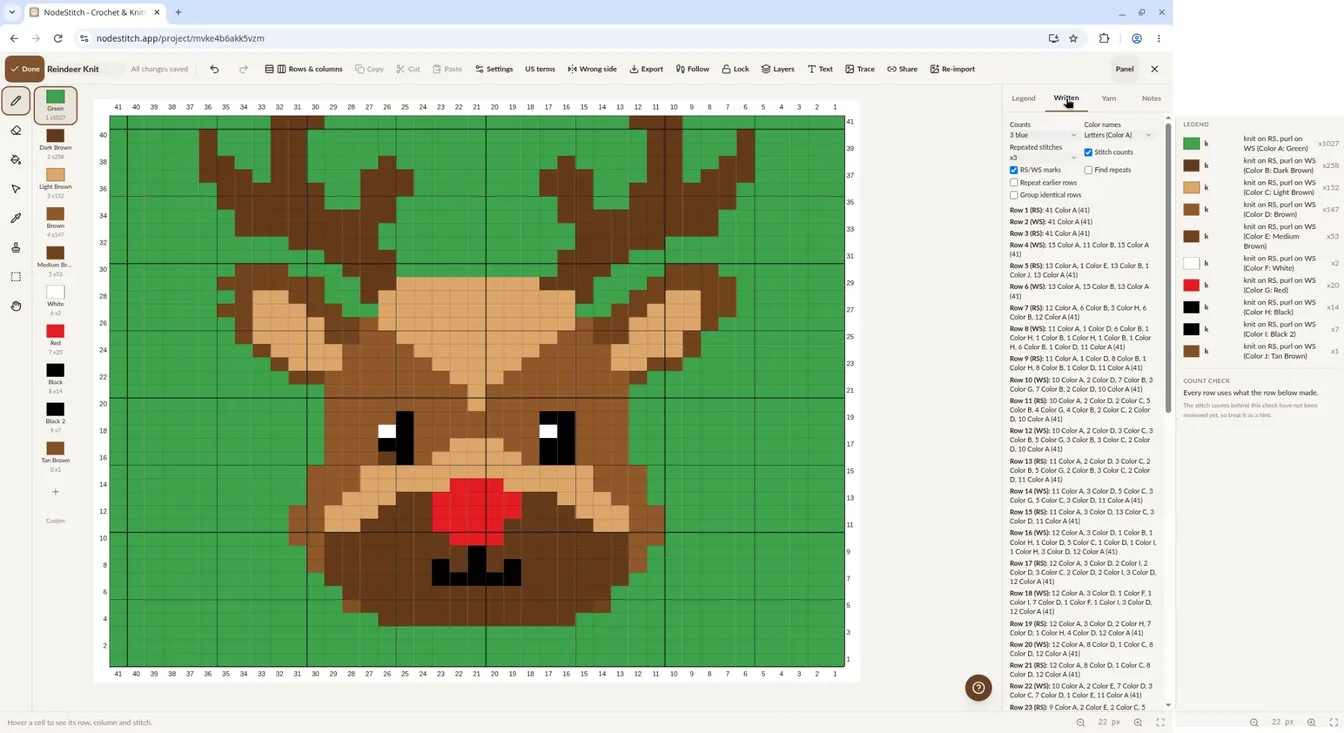
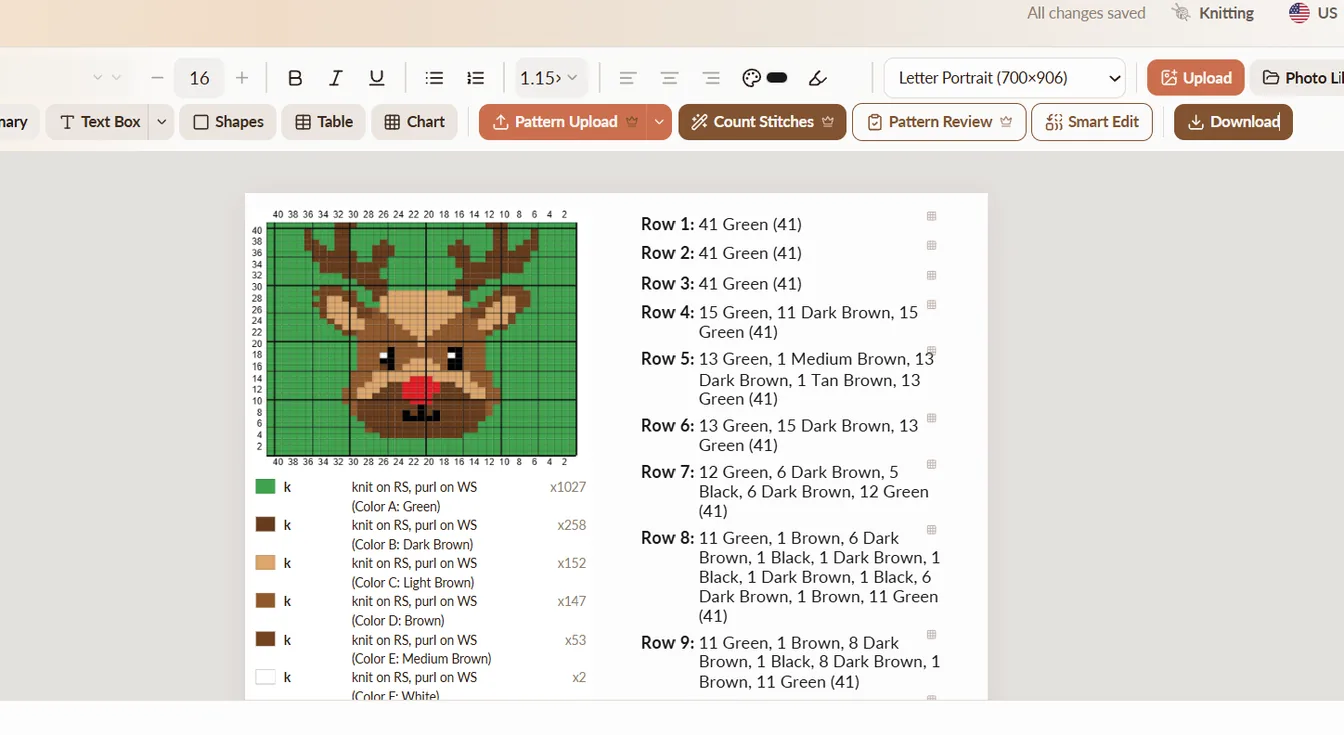
Switch Color names to names and the rows say what you’re actually holding: “15 Green, 11 Dark Brown, 15 Green”. Add them to your pattern and that’s how they read on the page, right beside the chart and its legend:
The smaller things
- Add to pattern as a table, with the rows in columns.
- Find repeats spots a repeat you didn’t draw a box around and writes it as one.
- Tunisian and brioche count whole rows, both passes together.
- Knitting charts got clearer cable crossings and brioche wording.
- Your charts are listed on the Dashboard under Stitch Charts, and you can delete the ones you don’t need.
On your phone
The NodeStitch iPhone app builds and follows charts too. You can start a chart from a photo there, up to 300 x 300 on Free, and match its colors to a yarn line or to DMC floss. Charts you make on the website are on the phone, and the other way around. Free-form diagrams, lines, text and custom stitches are made on the computer, and the phone shows them.

Keep telling me what doesn’t work
I’m nowhere near done, and this is where people who actually chart can help the most. If a round reads wrong, a photo doesn’t chart the way you expected, or something just feels clunky, tell me at support@nodestitch.app.
Everything else the chart editor does is on the stitch charts page, and everything NodeStitch does and doesn’t do is here.